Provides an overview of attenuation and Doppler pitch shifting.
Attenuation
In 3D audio, attenuation refers to volume attenuation—the effect of having volume fade with distance between emitter and listener. By default, XACT does not automatically apply volume attenuation as a result of calculating distance, or Doppler effect as a result of relative emitter and listener velocity.
The programmer controls the position and velocity of game objects, and the sound designer determines how that affects sound. Because XACT is designed to partition and simplify the work of the programmer and sound designer, XACT determines emitted sound by combining effects specified by the sound designer with positional information supplied by the game.
XACT exposes variables as placeholders for runtime game information such as position and velocity. The sound designer uses XACT RPCs to define the relationships between those variables and sound effects. The variables are then set at run time, either by the game or by XACT itself, and produce the desired sounds.
The project tree region of the XACT tool shows the available variables:

Figure 1. XACT Variables
Global variables are shared by all active sound cues. Only one of each global variable exists, and it is persisted the entire time the game is running. In contrast, a separate copy of each cue instance variable exists for every active cue. Cue instance variables persist only for the lifetime of an individual cue instance.
Global variables allow multiple audio elements to be controlled together. Cue instance variables provide individual control or information for each instance of a cue, and for each copy of the same cue.
.bmp)
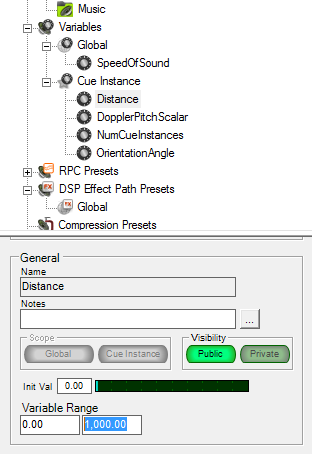
Figure 2. Cue Instance Variables
The variables used for 3D audio effects are the cue instance variables Distance, DopplerPitchScalar, and OrientationAngle. XACT updates these variables automatically for the cue when the game calls Apply3D.
The variables provide the following information.
| Variable | Description |
|---|---|
| Distance | The distance between the emitter and listener. |
| DopplerPitchScalar | A value calculated by comparing the relative velocities of the emitter and listener; used for Doppler pitch shifting. |
| OrientationAngle | The angle difference between the emitter and listener. |
XACT updates the cue’s Distance variable. However, by default, it does not adjust the volume for that cue. It isn’t the developer’s job to try to determine and set the appropriate volume. Instead, the sound designer defines the attenuation, which is the relationship between distance and volume. To do so, the designer uses the XACT tool to create an RPC. An RPC defines the mapping between an input variable, such as Distance, and an output parameter, such as sound volume.
The programmer might be tempted to query distance with Cue.GetVariable("Distance"), and then, based on distance, try to set the volume of the cue. However, volume can normally be set only for categories of cues, defined by the sound designer. See How To: Change Sound Volume Levels. The game code would also have to calculate the proper volume change based on distance. To avoid these issues, simply use an RPC as described in this topic and let XACT perform attenuation automatically, as designed.
Defining the Distance Scale
To define the Distance scale
-
Click once on the Distance variable in the tree.
The properties pane, below the project tree, will display properties for the
Distancevariable. Look for the section named General. -
Inside the General section, find Variable Range.
The left box is the minimum value, and the right box is the maximum value.
-
Enter values into these boxes that are appropriate to the game’s world scale (or whatever scale is used when calling Apply3D).
Distances outside the specified range are clamped to the range. The designer need not worry about extreme values when determining the curve. For example, a game uses a 1 m (one meter) game scale, and sounds trail off completely near 1000 m. The minimum value would be 0, and the maximum value would be 1000.

Figure 3. The Variable Range
Creating a Distance::Volume RPC
To create a Distance::Volume RPC
-
Right-click the RPC Presets node in the project tree, and select New RPC Preset.
XACT creates and displays a new RPC, and opens it for editing.
-
Set the Variable drop-down to Distance (the default is
OrientationAngle). -
Set the Object drop-down to Sound.
-
Set the Parameter drop-down to Volume.
The RPC now adjusts volume based on distance. However, the curve is created flat, which means that volume will remain constant over distance. To change that, and define the attenuation, you must adjust the curve. In the curve plot window, distance is on the x-axis and volume, in decibels, is on the y-axis. To attenuate over distance, Y (volume) should decrease as X (distance) increases.
-
To create a new control point, double-click anywhere on the plot line.
The curve is split and a new adjustable control point is added.
-
Add and adjust as many curve points as needed to define the attenuation.
Different sounds may have different attenuation characteristics. These two example curves produce significantly different attenuation. The first creates a simple constant ramp from full volume (+0 dB) to silence (?96 dB) over the full distance range. The second has a fast rolloff after a short distance, then a fade out to full distance.
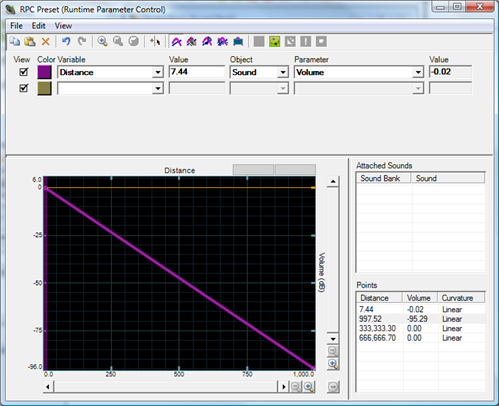
Figure 4. Attenuation RPC (Constant Rolloff)

Figure 5. Attenuation RPC (Quick Rolloff)
-
When finished, close the RPC window.
The new RPC is called “RPC Preset,” but it can be renamed (for example, to “Attenuation”) to make it easier to find in the RPC list. The name given to the RPC does not affect the RPC or the game code.
-
To rename the RPC, right-click it and click Rename.


Applying the RPC to Sounds
To apply the RPC to sounds
The RPC is now defined, but no sounds are configured yet to use it. By default, sounds do not use any of the defined RPCs. Some sounds will not need attenuation (for example, narration or tutorial instructions), while others may need several different RPC effects.
-
Double-click on a sound bank listed in Sound Banks in the project tree.
The sound bank opens, showing the sounds and cues defined in that bank.
-
From RPC Presets in the project tree, drag the desired RPC onto the sound that will use that RPC.
Do this for as many sounds as will use the attenuation effect. You can apply more than one RPC to a sound. RPC curves that modify elements such as pitch and volume are additive, so if multiple parameters influence the sound, their results will be combined.
Removing an RPC from a Sound
To remove an RPC from a sound
-
To remove an RPC from a
sound, either right-click the sound and click Attach/Detach RPC(s), or right-click the RPC in the project tree and click Attach/Detach Sounds. -
Right-click the sound and click Attach/Detach RPC(s).
At this point, the attenuation RPC is defined and applied to the appropriate sounds. XACT will now use the curve to adjust emitter volume based on the distance between emitter and listener. Game code sets theAudioEmitter.Position and AudioListener.Position properties to specify the 3D location of the game objects. When the code then calls Apply3D, XACT adjusts volume appropriately. See How To: Apply Basic 3D Positional Effects to a Cue for a description of the steps needed to use 3D positioning in a game.
Doppler Pitch Shifting
Doppler pitch shifting is the pitch shifting effect when a listener and an emitter are moving towards or away from each other. The relative velocities of the emitter and listener are compared and the result used to pitch up or down the emitter’s sound.
Doppler pitch shifting is applied to sounds in the same way that attenuation is, except that the RPC adjusts pitch based on relative velocity rather than adjusting volume based on distance. The Doppler RPC ties theDopplerPitchScalar input variable to the Sound::Pitch output parameter.
Adding Doppler Pitch Shifting
To add doppler pitch shifting
-
Set the scale of the DopplerPitchScalar variable.
The default scale of 0–4 is appropriate, so leave MinimumValue at 0 and MaximumValue at 4.
The scale of DopplerPitchScalar is not based on the velocity scale used by the game. Instead, this value is the result of an XACT calculation to determine the pitch adjustment that should be applied due to Doppler effect. 0 indicates down 1 octave, 1 indicates unity pitch, and 4 indicates up 2 octaves.
-
To create a new RPC, right-click RPC Presets, and then click New RPC Preset.
-
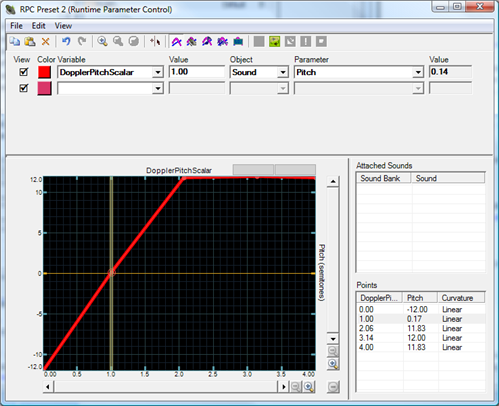
Set Variable to DopplerPitchScalar, Object to Sound, and Parameter to Pitch.
-
Define the Doppler curve effect.
The y-axis is the pitch, in semitones, and ranges from down one octave (?12 semitones) to up one octave (+12 semitones).
For normal Doppler effect, the beginning of the curve would look like this:

Figure 6. Doppler RPC
However, this curve limits the effect to +12 semitones. To enable a wider range effect, make the curve half as steep (+12 semitones at 4.0 rather than 2.0) and set the emitter’s Doppler scale (AudioEmitter.DopplerScale) to 2.0f.
-
Close the RPC window and, if desired, rename the RPC.
-
To associate the RPC with sounds, open the sound bank, and then drag the RPC from the project tree onto the desired sound or sounds.
Code Changes to Support Doppler Pitch Shifting
XACT derives DopplerPitchScalar based on the relative velocities of the emitter and listener. The game informs XACT of these velocities by setting the AudioListener.Velocity and AudioEmitter.Velocity properties before callingApply3D.
The AudioEmitter.DopplerScale property can be used to exaggerate (values > 1.0) or diminish (values < 1.0) the Doppler effect.
The following example moves an object left and right. The gamepad triggers can be used to turn emitter and listener velocities on and off. Combined with an XACT project that defines RPCs as described in this topic, the code demonstrates the steps needed to enable attenuation and Doppler effects.