Welcome to part 3 of the
introduction to XNA series. Last time you converted the TinyTennis sample to run on the Xbox 360 and added the
sound effects back in. This time I will cover some more audio effects and also add the scores back in as well as explain some of the background behind
XACT and font rendering in the XNA Framework.
Before you go any further I need to explain how XNA works on the Xbox 360. Microsoft
created a version of the .Net compact framework that runs on the Xbox 360, as well as Xbox versions of the XNA assemblies. To get these assemblies onto
your Xbox 360 and enable deployment of XNA framework requires that you join the Creators Club which has a cost associated.
The changes you will make for this article will work on the PC too, but you will not be able to play on the Xbox 360 without this. Microsoft have
provided a video to help you get this installed: Getting Started with the XNA Creators
Club.
Note that XNA Game Studio Express has an upgrade. The 1.0 Refresh was released on April 24th 2007. The code for this
and future columns will be based on the updated version so if you have not already upgraded then go and download now. Then read about the new features and check out the API changes.
One Quick Audio Fix
There’s an interesting bug in the build from last time which is hard to reproduce.
Occasionally the code will crash with a InstancePlayLimitException. The reason for this is due to a) the default options in XACT and b) a possible bug
in the XNA Framework. The bug occurs when the ball bounces twice very close together like when the bat is near the top or bottom of the screen. The
reason is that the default sound settings in XACT limit each cue to play a single instance. If the cue is called a second time and the first is still
playing then XACT should just not play the second sound. However the XNA framework sees this as something that requires an exception to be thrown. You
can see the discussion about this item in the XNA Audio forums.
To fix this you should change the sound cue to allow
multiple instances. Open up the .xap project from the project folder and open the sound bank window and make the following changes.
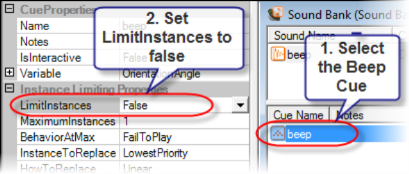
Now you can have as many instances of the beep sound playing
as you want.
Changing the pitch of the sound
If you followed the sound
tutorial from last time you would probably be thinking “wow, that’s a LOT of work compared to calling the .Net SoundPlayer class”. Instead of 2-3 lines
of code you had to create special files in a tool, package those files in your project and after all of that it was still more lines of code to play the
sound. The only obvious advantage is that you can play more than one sound at a time.
So I would like to show you one of the cool
things you can do using XACT – changing the pitch of the sound as the ball bouncing speeds up. In the past the audio designer would have had to describe
the effect to the developer, the developer would have to get a sound library or write code to do the sound manipulation and each change would have had
several iterations before everyone was happy. With XACT the sound designer has all of the control and the only thing the developer has to do is pass in
a single variable.
First, open up the XACT project that you created last time. Don’t forget to use the version of the XACT editor
that is in the XNA Game Studio Express folder. Since XACT often changes with the DirectX SDK you need to use the one which is compatible.

When the Variable Settings dialog appears all you need to do
is rename the variable to BallSpeed.

You have just created a variable which will be visible from
your code. When you change the value of that variable you want it to have an effect on the sound. To create the effect you need to create an RPC Preset. RPC in this case stands for Runtime Parameter Control and allows you to manipulate the cues based on an input
value. Create the RPC Preset by right clicking the node in the project tree:

For now ignore the dialog that appears I will get back to that
in a moment. Right click the RPC Preset node that just created and rename it to BallSpeedEffect.
To associate a sound with an RPC
preset you must drag and drop the sound onto the preset.

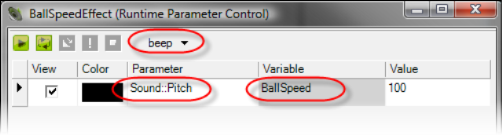
You should see that the BallSpeedEffect dialog box now shows
‘beep’ at the top. While you are looking at the dialog change the Parameter to Sound::Pitch – because we want to change the pitch based on the speed –
and the Variable to BallSpeed – which is what we will pass in to the program.
Now the question you need to ask yourself is ‘how do I want
the pitch to vary based on the input variable?’. Since XACT is a sound designers tool it allows you to set this relationship in great detail. But to
know if you have it right means you have to be able to listen to the sound. The architecture of XACT means that you cannot play sounds directly from the
tool but you have to run a separate auditioning application before the ‘Play’ buttons will work. You can find the XACT Auditioning Utility in the same
place as you found the XACT editor in the Game Studio Express folder.

When you run this tool you will just see a console window
appear. Minimize it and forget it’s there.
Now you can use the control buttons on the top of the dialog to audition the beep
sound.

Right now all you will hear is the normal beep that you heard
in the game. But now comes the fun part. Press the ‘repeat’ button and then the ‘play’ button so that you hear the beep repeatedly. Then in the section
below you can move the black dots up and down to represent the curve that relates the input variable to the output variable. You can drag the dotted
line left and right to simulate passing in different values to the BallSpeed variable and you will hear the effect in real time. This diagram is made
from multiple screen shots (should be obvious since there are 3 mouse pointers) but you should get the general idea.
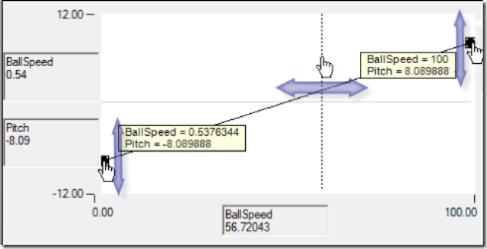
I have created a curve where an input of 0 will drop the pitch
by a factor of 8 and an input of 100 will raise the pitch by a factor of 8. You can add points to the curve, make flat parts – whatever you want.
So the work in XACT is done. Save the project and open the C# solution file.
Firstly you need to speed the ball up
when it bounces off each bat. In Ball.cs add the following 2 lines of code:
//Bounce off the bats
if ((Velocity.X  || (Velocity.X > 0 && collision(_player2)))
{
//The ball speeds up with each bat bounce
Velocity.X = Velocity.X * 1.05f;
Velocity.Y = Velocity.Y * 1.05f;
Finally you need to translate the ball velocity into a variable in the range 0-100 to pass
into XACT. The code to play the sound changes a little too.
private void playBounceSound()
{
//Calculate a variable in the range 0-100 to pass to the sound engine
float ballSpeed = (float)Math.Max(Math.Min(((Math.Abs(Velocity.X) +

Math.Abs(Velocity.Y)) /2.0  - _initialSpeed)/4 , 100f), 0f);

Cue _beep = TinyTennis.soundbank.GetCue("beep");
_beep.SetVariable("BallSpeed", ballSpeed);
_beep.Play();
}
Run the app and listen to the pitch of the bounce increase as the ball speed increases.
Adding the Scores
I’m sure many of you are wondering why its taken this long to
add the scores back into the game, after all displaying some text is usually the first program people write in any new computer language or
framework. The big problem is (or rather WAS) the lack of text support in the XNA Framework. Text rendering on windows is done using the Truetype font system which is part of GDI and exposed to managed developers through the System.Drawing APIs. If you have used D3DXFont from native DirectX or its managed wrapper then you would be forgiven for thinking that DirectX also understands fonts. In reality the D3DX code uses
GDI to render the requested font into a bitmap which is then used by DirectX to render the text. In the case of the Text3D sample GDI is also used to get the outline description of the font and create a 3d model from that data. Since the
DirectX we know and love only runs on windows, having a dependency on GDI is not an issue. However whatever the core OS of the Xbox is (its not
something Microsoft make public) it certainly doesn’t have any Truetype or GDI support – its just not something professional game developers need and
the Xbox 360 is a specifically focused piece of hardware. This would make the font parts of D3DX very hard to implement and, in fact, D3DX is also not
supported on the Xbox 360 version of DirectX.
This left the XNA Framework team with a dilemma – how can you support fonts on both
Windows and Xbox 360 given that only one platform has the font rendering technology. For the first version they did not have time to implement a
solution but within weeks several 3rd parties provided solutions such as bitmap based Nuclex Fonts and XNA Font Creator and vector based stroke based fonts. The bitmaps
versions do a similar job to the D3DX implementation, except they create the texture either in the compilation process or in a separate tool that you
have to run before you run your application. Eventually Microsoft released a Font Sample themselves which created a content pipeline add in to create the bitmap font at
compile time. In the Game Studio Express refresh they included font support in the base product. It works in a very similar manner to the previously
release font sample and integrates into the SpriteBatch API that you have used in previous columns.
So after that history lesson how
do we actually add the scores to TinyTennis? Thankfully the XNA Framework guys have made it very easy.

Start by adding a new item to your project. From the dialog
choose the new Sprite Font item and call it PongScore. After you have created it you will see an XML file appear that describes the font you want to
make.
Change the name to the name of the font you want to use, the size and the style. In addition since you only need 0-9 you can
tell Game Studio Express to only use characters 48-57. Your XML file should look similar to this: (I’ve removed the comments for size here)
    <FontName>Comic Sans MSFontName>

<Size>48Size>

<Spacing>2Spacing>

<Style>BoldStyle>

<CharacterRegions>
<CharacterRegion>
<Start>0Start>
<End>9End>
CharacterRegion>
CharacterRegions>
After you have saved it don’t forget to drag and drop the PongScore.spritefont into the TinyTennis360 project too.
To
draw the font you use a SpriteBatch – which we already have around from drawing the bats and ball – and a SpriteFont. Declare the SpriteFont at the
class level in TinyTennis.cs
private SpriteFont _font;
Load the font in LoadGraphicsContent()
if (loadAllContent)
{
....
_font = content.Load("PongScore");
....
}
and draw it with the new DrawText overload in the Draw() function
//Draw the scores
SpriteBatch.Begin();
SpriteBatch.DrawString(_font, gameState.Player1Score.ToString(), new Vector2(300, 30), Color.Red);
SpriteBatch.DrawString(_font, gameState.Player2Score.ToString(), new Vector2(470, 30), Color.Green);
SpriteBatch.End();
Notice the color overloads to give each player a different color score.

That’s all for this time folks…. please send me feedback if you have
any ideas, find bugs, or have requests about which bits of XNA you would like tutorials for.